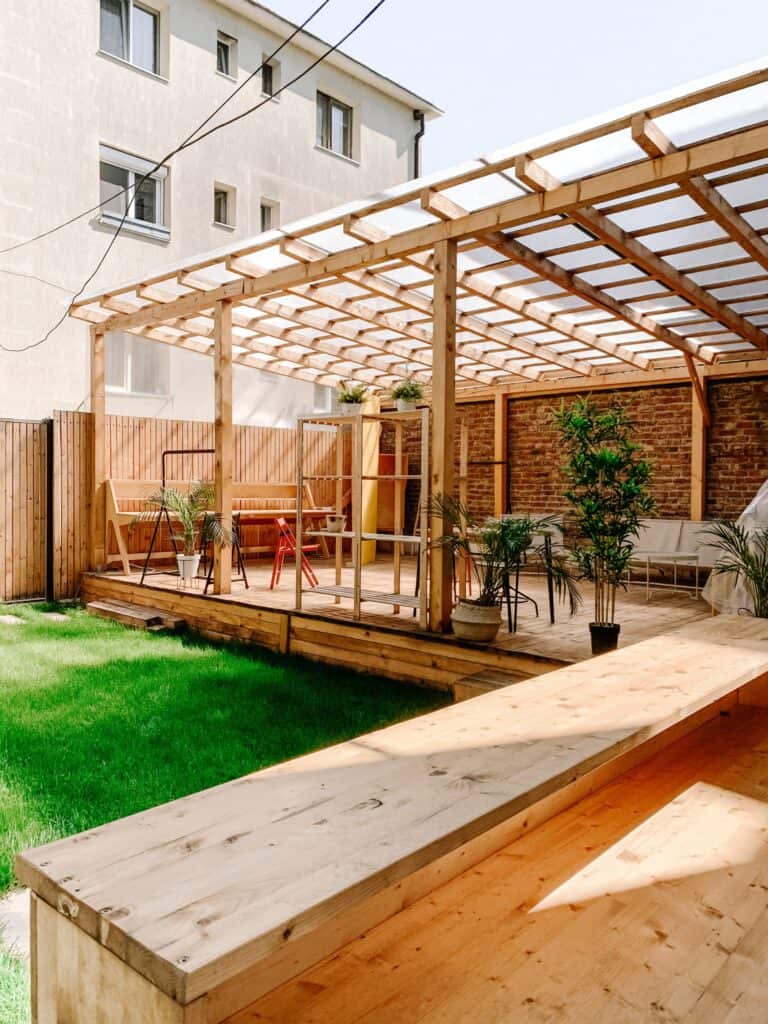
How To Build A Freestanding Patio Cover
Do you want to add some extra living space to your home but don’t want to go through the hassle and expense of adding on? A patio cover might be the perfect solution for you!
This blog post will teach you how to build a freestanding patio cover. This is an excellent project for any DIY-ers out there. We will walk you through each step so you can make your patio cover in no time!
What Is a Freestanding Patio Cover
It is an excellent addition to any yard. It protects from the sun and rain and can add value to your home. There are two main types of patio covers: freestanding and attached.
Freestanding patio covers are not attached to your home and can be made from various materials, including wood, metal, or canvas. The attached patio covers are made from aluminum or vinyl and connected to your home’s existing roofline.
Patio covers can be purchased prefabricated or custom-built, and a professional contractor or do-it-yourselfer can install them. If you’re looking for a way to extend your living space and enjoy your yard more, a patio cover is a great option.
The Benefits of a Freestanding Patio
Here are just a few of the benefits:
1. Increased outdoor living space: A patio can provide an additional outdoor living area, which is great for entertaining or simply spending time with family and friends.
2. Enhanced curb appeal: Homeowners with patios are likely to increase the number of buyers when they decide which homes fit their needs. A beautiful patio can also serve as a great extension for your home’s exterior, making it more inviting and valuable on both sides!
3. Improved home value: A patio will generally increase your home’s value. So, a deck is an excellent option if you’re looking for a way to invest in your property.
4. Added function: A patio can be used for various purposes, such as dining, entertaining, or simply relaxing in the sun. Plus, it can be easily customized to fit your specific needs.
5. Increased privacy: A seating area on your patio can help create a sense of privacy and intimacy that you may not get with an open yard.
How To Build A Freestanding Patio Cover
Here are the steps on how to build a freestanding patio cover:
Decide on the Size and Shape of Your Patio Cover
Building a freestanding patio cover, you’ll need to decide on the size and shape. The most common forms are rectangular, square, and octagonal. The most critical factor in determining the size is the amount of space you have available. You’ll also need to consider the number of people you want to fit under the cover comfortably. Once you’ve decided on the size, you can start planning the shape.
The three most common shapes are rectangular, square, and octagonal. Each has its benefits and drawbacks. Rectangular covers provide more coverage than square or octagonal caps, but they can be more challenging to build. Square covers are easy to make but don’t provide as much coverage as rectangular or octagonal covers.
Octagonal covers are somewhere in between. They’re not as easy to build as square covers, but they provide more coverage than square or rectangular covers.
Purchase the Necessary Materials
Now that you know the size and shape of your patio cover, you can purchase the necessary materials. For most surfaces, you’ll need wood for the frame, roofing material for the roof, and nails or screws to attach everything.
You can find all of these materials at your local hardware store. If you’re unsure of what you need, the staff at the store can usually help you.
Mark the Area
To avoid building code violations, it is essential to mark the area where you will be building your freestanding patio cover. This will help to prevent any potential accidents or injuries that could occur during the construction process.
It is also important to mark the area, so you know where to stop digging when excavating for the footings. When appropriately marked, the building process can proceed smoothly and without problems.
Dig the Holes
You need to dig the holes for the support posts. The depth of the holes will depend on the height of your patio cover, but they should be at least two feet deep.
After you have excavated the holes, you can place the support posts in them. Please ensure the holes are wide and broad so the seats can be securely placed.
Attach the Beams
The next step is to attach the beams to the support posts. This will provide the framework for your patio cover. There are a few different ways to do this, but the most common is to use metal brackets.
You will need to drill holes in the beams and posts to attach the brackets. Once the frames are in place, you can screw or bolt them together.
Attach the Roofing Material
The final step is to attach the roofing material. This can be done with screws or nails. Ensure the roofing material is securely fastened, so it doesn’t blow away in the wind.
You can now enjoy your new freestanding patio cover! Just add some furniture, and you’re all set.
How Tall Does a Patio Cover Need To Be?
A patio cover is a great way to enjoy outdoor space while protecting yourself from the sun and rain. But how tall does a patio cover need to be? The answer depends on a few factors, including the height of your patio furniture and the amount of sunlight you want to let in. For most patio furniture, you’ll need a cover at least seven ft (2.1 m) tall.
If you want to be able to use your patio during the day, you’ll need a cover that’s at least 10 ft (3 m) tall. And if you want to be able to use your patio at night, you’ll need a cover that’s at least 12 ft (3.6 m) tall. So when deciding how tall to make your patio cover, it’s essential to consider how you plan to use it. With some planning, you can enjoy your patio cover for years!
Other Interesting Reads
7 Wood Lattice Patio Covers Ideas