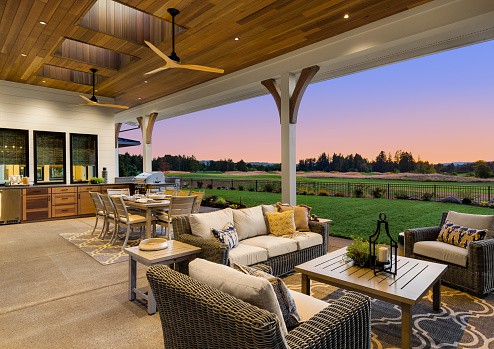
How To Build A Patio Cover With A Corrugated Metal Roof
Do you have a patio that you love to spend time on but wish you could use more often? Are you worried about the sun’s harmful rays or the rain ruining your fun? If so, then you need to build a patio cover! Patio covers are a great way to protect yourself from the elements and extend the use of your patio. This blog post will show you how to build a patio cover with a corrugated metal roof.
Materials Used
The materials used in this project are:
- (12) 12′ corrugated metal panels
- (24) J-trim pieces
- (24) F-trim pieces
- (48) screws
- Beams
- Joists
- (48) washers
Tips for Purchasing Materials
When purchasing your materials, it is essential to:
Building a roof is a big project that requires careful planning. You’ll need to consider the weight of the materials, the pitch of the top, and the weather conditions in your area. One of the most popular roofing materials is corrugated metal. It’s light, durable, and easy to work with. But before you purchase any materials, you should keep a few things in mind.
First, you’ll need to decide on the type of corrugated metal. There are two common types: galvanized and aluminum. Galvanized metal is coated with a zinc layer, making it more corrosion-resistant. Aluminum is lighter than galvanized steel, so it’s often used in areas where weight is a concern. However, it’s important to note that aluminum can be damaged by salt spray, so it’s not always the best choice for coastal areas.
Next, you’ll need to determine the pitch of your roof. The rise is the slope’s angle, affecting the look and function of your roof. A steeper pitch will shed water more effectively, but it will also be more challenging to install. If you’re unsure what angle you need, it’s best to consult a professional.
Finally, you’ll need to consider the weather conditions in your area. If you live in a room with high winds, you’ll need to use a different type of corrugated metal than if you live in a room with heavy snowfall. Check the wind and snow load ratings for the metal you’re considering before purchasing.
Beginning Construction on the Patio Cover
To begin the construction of the patio cover, there are a few things you’ll need to do:
Install the Ledger Board
The first step is to install the ledger board. The ledger board is the horizontal support attached to the house. It is essential to ensure that the ledger board is level and plumb before connecting it to the house. If it is not level, the metal roof will not be level and will not look good.
To install the ledger board, you’ll need to:
- Measure the width of the patio.
- Cut the ledger board to size.
- Attach the ledger board to the house using lag screws.
It is essential to make sure you use lag screws and not nails. Nails will not hold the ledger board in place, eventually falling off the house.
Dig Post Holes
The next step is to dig post holes. The post holes must be at least 24 inches deep and 12 inches in diameter. You’ll need to drill one hole for each post.
To ensure that the post holes are the correct size, you can use a sonotube or a cardboard tube. Nanotubes are available at most hardware stores and are made explicitly for this purpose. If you cannot find a sonotube, you can use a cardboard tube. Just make sure that it is at least 12 inches in diameter.
Once the post holes have been dug, you’ll need to:
- Place a sonotube or cardboard tube in each hole.
- Fill the hole with concrete.
- Allow the concrete to cure for at least 24 hours before proceeding.
Install Posts
After the concrete has cured, you can install the posts. The posts must be cut to size and then attached to the ledger board.
To attach the post to the ledger board, you’ll need to:
- Place the post in the post hole.
- Use a level to make sure that the post is plumb.
- Attach the post to the ledger board using lag screws.
Again, it is essential to use lag screws and not nails. Nails will not hold the post in place and eventually fall off the ledger board.
Install the Metal Roofing
The next step is to install the metal roofing.
To do this, you’ll need to:
- Unroll the metal roofing and cut it to size.
- Place the metal roofing on top of the posts.
- Attach the metal roofing to the posts using screws.
It is important to use screws and not nails. Nails will not hold the metal roofing in place and eventually blow off the house.
Finish Up
After the metal roofing has been installed, you can finish up by:
- Add trim around the edge of the roof.
- Adding a gutter system to collect rainwater.
If you follow these steps, you’ll be able to build a patio cover with a corrugated metal roof that will last for years. Use high-quality materials and consult a professional if you’re unsure about anything.
Must one get Building Permit for a Patio Cover?
Building permit requirements vary from state to state and even from city to city. Most building projects will require a permit, including patio covers. This is because patio covers can be attached to the house and thus affect the home’s structure. In addition, patio covers can also impact the surrounding property, including drainage and runoff.
As a result, it is essential to check with your local building department to see if a permit is required for your project. Even if a license is not required, getting approval from your homeowner’s association or other governing body is always a good idea before beginning any construction. These precautions can help ensure your project is completed safely and without complications.
Other Interesting Reads
7 Wood Lattice Patio Covers Ideas
How To Build A Gable Roof Patio Cover